December 25, 2014


December 22, 2014
December 21, 2014
*****
December 15, 2014
I've finished the snowflake "Faux Frozen" quilt for the little girl to whom our friends wanted to give such a quilt. I had to rush with such a short timeline, and the corners of the quilt are a little bulky and uneven, but it's finished. I quilted around the snowflakes with white thread for daisies (which look like snowflakes) and pink thread for hearts, and a few other decorative stitches. I quilted just a single diagonal line through each of the nine-square blocks, and did some "in the ditch" and "beside the ditch" quilting along the two inner vertical seams. The back is a fabric called Winter Wonderland by Exclusive Quilt Fabrics.

December 12, 2014
The front of the winter quilt is finished! Now on to the back, batting and quilting.
December 11, 2014
 Success: I've appliqued three snowflakes attached to the dark blocks ... with yo-yo's in the centers ... four to go, and then I can start quilting. planning to have this one finished at the end of the weekend. Note to self: next time, finish embellishing blocks before putting blocks together.
December 10, 2014
I have, with Rick's help, finished designing the simple six pointed snowflake that I want to use on the quilt's dark blocks. Appliqueing on is the next step: would have been much simpler to have done this before I put the blocks together.

 Only five more snowflakes to go ... then I have to figure out how to applique them to the blocks!
December 9, 2014


A few more hours, and now past my bedtime, but I have finally figured out what I'll use to embellish those dark blocks ... this is a rough approximation of the snowflakes I'll add tomorrow:
November 20, 2014
November 9, 2014
November 7, 2014

The back is one whole piece of
black hats and tea cups on pink
October 29, 2014


October 23, 2014
October 22, 2014
October 16, 2014
After a lovely day in Maine with our daughter and grandchildren, we had a quiet morning back at home today, and time to return to the unfinished Christmas quilt. This makes sixteen solo quilts this year!
I attached the denim "Osh-kosh-b'gosh" pocket and another denim pocket to the center blocks of the quilt, finished the quilting of each 15" block with alternating directions and serpentine stitching, broke three Bernina #12 needles doing so, ran out of bobbin thread twice more, but finished in time to delivery it in time for Christmas Supper. Then we spent a few hours at my sister's house with her family, and are now home relaxing with our new slippers on our feet.
I attached the denim "Osh-kosh-b'gosh" pocket and another denim pocket to the center blocks of the quilt, finished the quilting of each 15" block with alternating directions and serpentine stitching, broke three Bernina #12 needles doing so, ran out of bobbin thread twice more, but finished in time to delivery it in time for Christmas Supper. Then we spent a few hours at my sister's house with her family, and are now home relaxing with our new slippers on our feet.
 |
| The finished front |
 |
| top half |
 |
| the back: doubled fabric from the Lowell Quilt Museum collection |
 |
| bottom half |
December 22, 2014
Time to get back into the child's outgrown clothing quilt. I have finished piecing the twenty blocks of sixteen 3.5" squares, and nine of them have sashing that extends the block size to 15" each. But there are still some odd-size cut outs of favorite personalized t-shirts that I have to work into the quilt. I'm planning to use them as 'applique' pieces right over the sixteen squares of each block. I'll post new pics tomorrow.
 |
| eight blocks done ... twelve to go for the front |
December 21, 2014
 |
| I alternated direction in serpentine diagonal quilting rows, about 1/12 inches apart. |
 |
| The quilt measures 44 x 60", with four rows of six blocks. I think next time I'll position the red blocks away from the corners. |
At seven pm, just about 24 hours after starting the quilt and pillow case yesterday, with a brief five hours sleep between 2:30 and 7"30 am this morning, I finished the quilt! I added diagonal serpentine stitch quilting, went through five bobbins, and after cleaning twice and oiling once and still hearing "thunk thunk thunk" while attaching the binding, I realized that the needle had gone dull; new needle, no sound, and a finished quilt. We were done in time to go to our friend Barb and Lou's house for a lovely bowl of soup and great company, and then were home here by 9:30. It is now a three Advil night, as my left shoulder is aching from holding the weight of the quilt while guiding the blocks through the alternating direction of quilting stitches. But it is done!
It's almost noon; the quilt top is bordered, pinned and ready for quilting:
 |
| The long table in the back room is great for pinning the three layers together. |
 |
| Checking to make sure the pins go through to catch the back |
December 20 - 21, 2014
in the wee hours between Saturday and Sunday:
 |
| A surprise quilt for a little girl's friend |
 |
| and a pillowcase to match |
I've finished making the twenty blocks for the quilt made of a child's outgrown clothing. But before I back and quilt it, I had another surprise quilt needed. This one is for the friend of the little girl for whom I made the snowflake quilt I began it after supper, and got as far as the top and the pillowcase in the wee hours .I'll back and quilt this one so tomorrow so that it can be delivered on Monday.
And the other, pictures below, will be backed and quilted in time for a Tuesday night before Christmas Eve delivery. It was challenging to put such varied colors and textures together, but I stuck with a light/dark pairing and made it work. Now to find enough in the bag of remnant clothing pieces to finish sashing each block and then join them together for the finished front.
This is what Christmas is all about - making people happy, filling needs, and working right up to the day itself to create something unique. It is part of what helps me reach that center goal: be happy!
December 18, 2014
I'm back to working on another quilt this week: if I can finish it in time for Christmas Eve, the mother who ordered it will be very pleased. I've made some progress working with the partially-cut collection of her daughter's clothing and some other favorite fabrics left with me this fall. There was no deadline proposed, but I would like to finish this up for her. Here's what I've completed in the past two days: I've planned a 60" by 75" double bed sized quilt of 15" blocks (four by five rows in all.) Among the fabrics is a large piece of fabric sponsored by the Lowell Quilt Museum ... I'm planning that for the back!
 |
| close up of blocks consisting of sixteen 3.5" squares with a border of tartan at the left and top edges |
|
| eight blocks done ... twelve to go for the front |
December 16, 2014
This morning I made a pillowcase to go with the snowflake quilt:
 |
| I used the quilt's soft cotton materials without glitter so she could dream easy of the winter woodlands. |
 |
| Machine quilting on my ten year old Bernina Activa 125; I love the decorative stitches but oh, what a tangle to do blocks in the middle! |
 |
| Add caption |
December 12, 2014
The front of the winter quilt is finished! Now on to the back, batting and quilting.
 |
| All the snowflakes and yo-yo's attached. |
 |
| Ready to attach the winter woodland back. |
December 10, 2014
I have, with Rick's help, finished designing the simple six pointed snowflake that I want to use on the quilt's dark blocks. Appliqueing on is the next step: would have been much simpler to have done this before I put the blocks together.
 |
| I will type up the measurements and post a kit for this pattern at the webstore. |
December 9, 2014
Sometimes life just gets so busy there isn't time to write about it! That's where I am this month ... a customer brought me a few bags of her child's clothing and asked if I could make a quilt of it. A friend of hers had begun and had cut squares and strips, so I started in by joining some of what was already cut. There are many, many more pieces to fit together, and whether I'll be able to finish it by Christmas remains to be seen.
On the same table, underneath this pile of fabric and blocks, is the small lap quilt that I've begun for another little girl - a friend of mine was looking for a "Frozen" theme gift for her. I don't have the Disney fabric line, but I do love winter and always have some winter fabrics on hand. Here's what I'm working on for her:
Another friend, who DOES have Disney's Frozen fabric offered to make an accompanying pillowcase! I'll keep you posted, if I have time between now and Christmas. :) Now, are those white borders around the snowflake fabrics too wide? ... I'll have to think about that ... if the borders make the 9" block 15" and I'm doing a 3x5 block quilt ... hmmm 45" x 75" sounds a bit too big for a little girl's lap.... I'll be trimming those back, I think...
THREE HOURS LATER...
 |
| Making progress ... now for some borders and embellishing! |
And another hour after supper yielded sashing to widen the quilt. Next will be the batting and backing, then quilting and binding, then the fun of embellishing! I must have some snowflake buttons somewhere... :)
 |
| My nine blocks are not evenly distributed by pattern, but I don't think a little girl will mind. |
 |
| The real one based on these trials will be a bit smaller to fit within the block and borders. Stay tuned! |
November 20, 2014
I've finished the second of the twin toddlers' quilts. All they need now is their labels, and then they can be delivered to the twins' grandmother. Remember, you can click on each image to see a larger view. And I'll begin the next quilt project on the growing list!
 |
| The front of his ... |
 |
| ... and the back of his |
 |
| Front of his and hers |
 |
| Back of hers and his |
November 9, 2014
We spent a lovely day in Boston at the Christmas Festival today. And when we came home mid-afternoon, I sat down and finished one of the toddler quilts. I wanted to honor the grandmother's preference for a border of bunnies, and the painter's suggestion of a black border to accent the hats. The black trim, though, didn't look very 'connected' on the Carousel/bunny/flower garden/hats side of the quilt, as only the hat block had black to share. But when I put it on the all-hats' side, it definitely 'popped.' Now the question is, which side is actually the front of the quilt, and which the back? Only the toddler herself will be able to make that distinction~
 |
| The original front, with Carousel blocks, bunnies, flower garden and hats |
 |
| The presumed back, which, with it's snappy black frame, looks quite equal to the front! |
November 7, 2014
The back is one whole piece of
black hats and tea cups on pink
 |
| The front was a little more challenging... |
Getting closer to finishing this one. all of the piecing is done and re-done, finally decided as a four by three quilt rather than a tall and skinny three by four. There are six carousel blocks featuring the fabric of Elizabeth Golz Rush, our shop's new consignment artist (learn more about her at our page about Massachusetts women artists) Six alternate blocks consist of three print fabrics: rows of bunnies, black hats floating with tea cups on a pink background , and a blue garden with a yellow floral border. After trying the pink blocks in various spots, I finally decided that the bunnies and the flying hats ought to be above the garden, not planted below it.
The quilting was easy to choose: I used my favorite serpentine stitch moving diagonally across each block, and reversing the diagonal direction for the next block. Each line of stitching is about an inch and a half away from the next one.
What's left to do on this quilt will have its own conundrum: to use a thin black border or piping between the quilt and more bunnies? Or a sashing of the garden blue before a black border? But her Grandmother favors a bunny border ... so ... back to work~
October 29, 2014
While working on the toddler quilts, I decided to create a pattern for a potholder quilt that our Quilt of Valor group can use. I played with some of the pink and turquoise fabric scraps, made some mistakes, learned some new lessons, and am on my way to creating the formal pattern. When it is finished, I'll post it at the online webstore to help others who want to recreate this Civil War era design.
Large groups of women made innumerable quilts for both union and confederate soldiers, and while it is said that some communities worked together on quilts, others took fabric home and made their own portions to be brought back and joined with others. That is the sort of pattern that I want to re-create ... something that can mix both hand and machine quilters' work.
Very few potholder quilts of the Civil War era exist today, because most were made with homespun or early-milled fabric remnants and stitched with cotton threads that wore out with the rough conditions and heavy use during the war and afterward.
Here's the fun I had tonight with scraps: not perfect, but enough to start. I also made a larger size single block, but left it partly open and partly quilted and joined to show the group step by step how it is done. We meet tomorrow morning.
October 23, 2014
Tonight I am starting the first of two quilts for a friend's grandchildren ... both toddlers. Marci is one of our shop's consignment artists; she works with silver and enamel and makes beautiful one of a kind jewelry pieces. An artist herself, Marci has an eye for color and plucked four bolts of material from our collection for her granddaughter's quilt and I am still amazed at how well the colors work together. The four are from four different fabric companies with different artists. Here's what I'll be working with:
 |
| The carousel block is from our new artist, Elizabeth Golz Rush, whose fabric lines are printed by Northcutt Fabrics. |
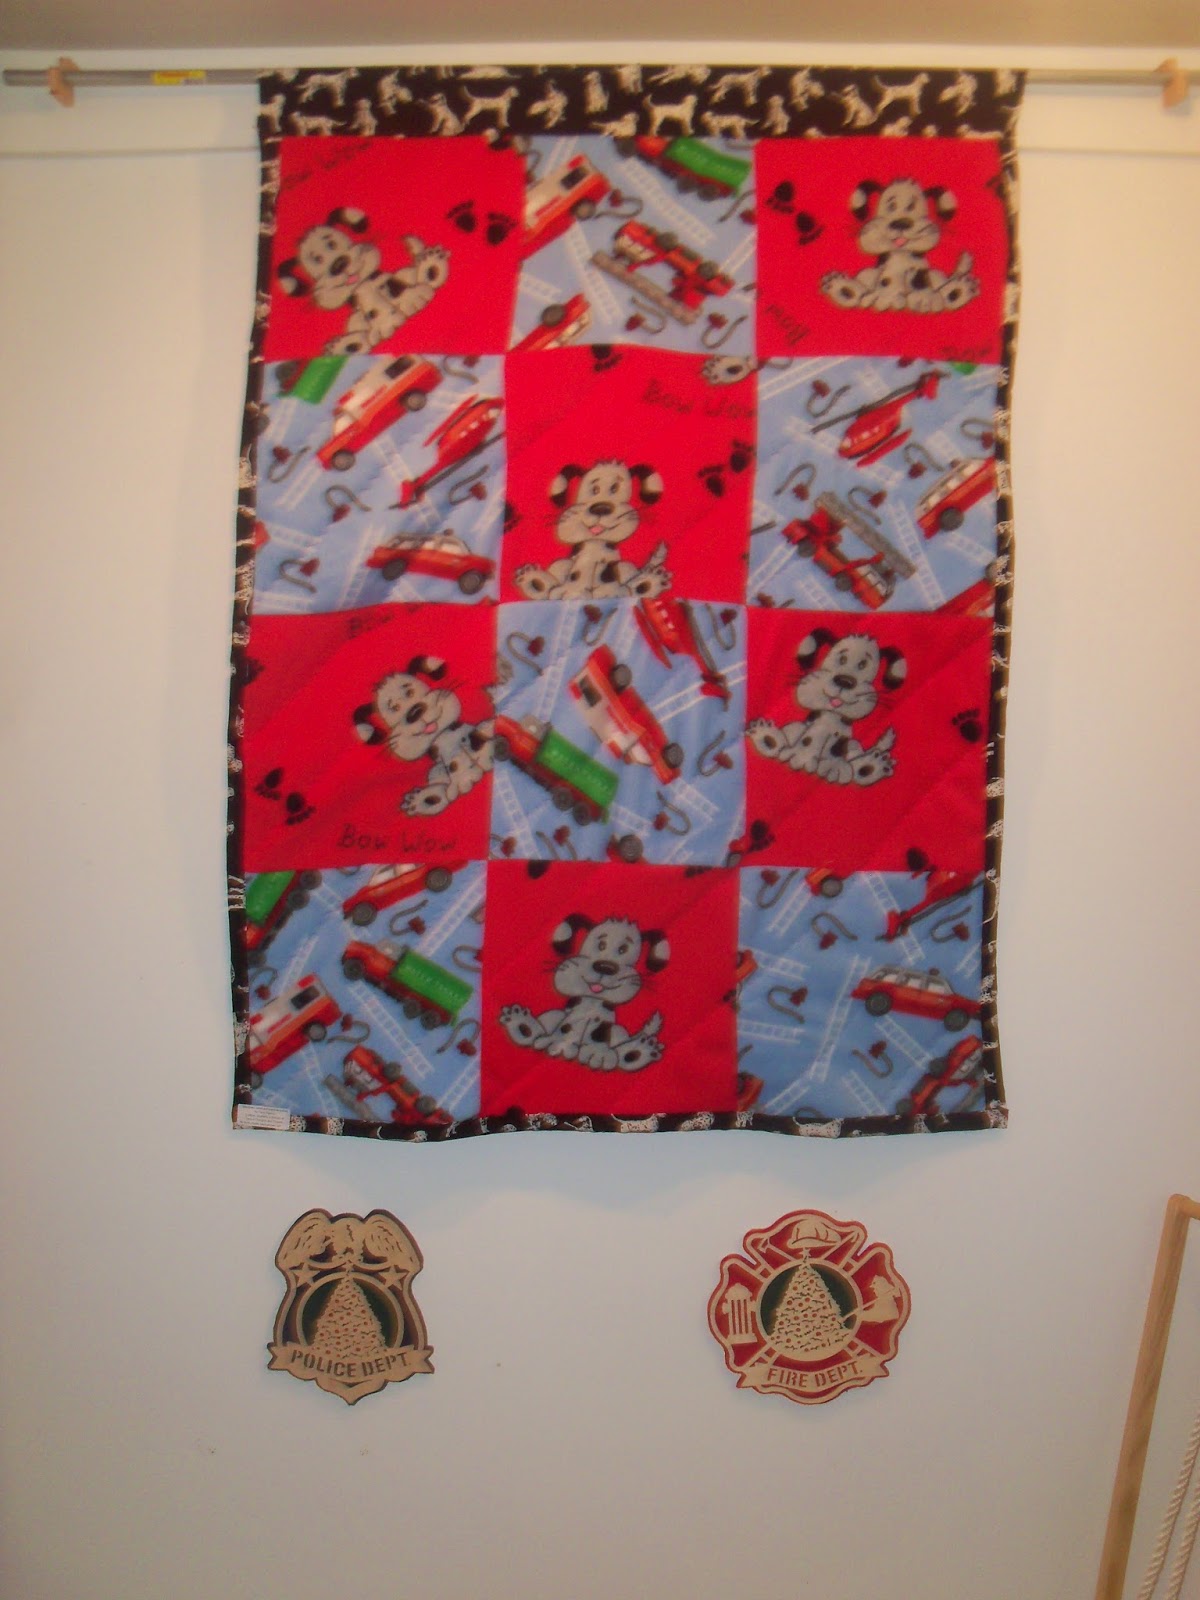
After setting up the quilts that I'd made to showcase Rick's woodworking art, we realized that we had room and a need for another one, to go with the Police and Fire Department plaques. And so I came home that night and cut out some blocks from fleece that I had used a few years ago. One piece had different emergency response vehicles on it, and the other had some sooty-looking Dalmatian pups.
I cut squares of fourteen inches, fussy cutting the dalmatian print to center the pups in the blocks. Then I cut the vehicle fabric, joined them in rows, and headed for bed. After breakfast Tuesday morning, I cut a yard and a half from a bolt of red with Dalmatians, and a half yard from a matching black bolt with the same Dalmatians. I joined the red back, poly batting and the quilt top together, quilted it diagonally with serpentine machine stitches, then bound it with the black. By mid-afternoon, the quilt was finished, and I put a header on it to hold it on the steel bar in the display, and we were off to finish the last alcove and greet our guests at Rick's Art Exhibit Reception. Here's the last minute quilt:
Once the construction quilt was done, things picked up speed here. I've made two more quilt tops, and managed to back, quilt and bind one of them. Here it is, featuring vintage children creating what might be holiday gifts: click on each picture to view larger.
 |
| Little children busy with their crafts surrounded by buttons and spools of thread |
 |
| The children sewing quilt has a border of black on black on black print. |
 |
| Backed and bound with a deep red tone on tone fabric ... so soft! This quilt will be in back of Rick's sewing and knitting plaques at his art exhibit at the Pine Grove School in Rowley. Reception is Tuesday evening, 10/21/2014, from 5 to 7 pm. |
 |
| Four fabrics for Halloween: monsters, witches, pumpkins and cats! |
 The Halloween quilt top is next to be backed, quilted and bound. It will be the background for Rick's Halloween plaques and carousel figures.
 |
| A close up of the top corner of the construction vehicles quilt that will be a backdrop for Rick's exhibit of wooden cars and work trucks |
The construction truck quilt is finished. I had bought the bolt of panels and the second bolt of matching border fabric at the New England Quilt Supply at the end of summer, planning to make the quilt for the Pine Grove School's art exhibition of Rick's scroll saw work. And I had ordered online a bolt of fabric that I thought was candy corn, for the Halloween collection. When that bolt came in the mail I opened it, and read the packing slip, and was surprised to find that what I thought was candy corn was actually road construction cones - and was part of the same line as the construction fabric by Timeless Treasures! Here's the quilt - it took longer than I'd planned as I decided to free motion quilt around the vehicles.
 |
| The construction quilt front; it is twin size. |
 |
| To meet the width of the front, I added wide borders of the construction cone fabric to a full width of 44" muslin. |
September 10, 2014


This week I've been working on two Christmas quilts this week for a customer who asked me to batt, back, quilt and bind them for her. Here's a picture of the first one finished, and the second one ready for a back. Enjoying happy hours quilting with Christmas music playing in the background.

August 24, 2014
I've been working, slowly but surely and in-between cutting kits through July and August for the Row by Row quilters who have been visiting Quilters' Quarters, on a memory quilt I was asked to make for a young woman whose mother passed away. She brought me ten articles of clothing and said that she had heard I might be able to make something of them.

The fabrics are of different weights and style, and for a week or so I looked at them, thought about options, about challenges with such unique materials, and asked friends who quilt what they might suggest. I considered whether to add photo blocks. I asked the girl if she had images she could share with me, but she said no, she didn't want photos, just fabric blocks.


The front is now finished, and I'm ready to make the back. I have three cotton items chosen for that; a black and white print, a pink flannel bathrobe, and a golden yellow print sundress with a fancy waitsline trim. I'll be back with a picture of what I decide to do with those fabrics. The two remaining are sweaters; I haven't come up with any way to add those to either the back or front, and so won't cut into them, planning to return them to the daughter with my apologies.
 August 26th: The quilt is finished: backed with the cottons, sandwiched with the batting, quilted with diagonal lines of serpentine stitch, white on the cotton side and invisible nylon on the polyester-knit side, bound with black on black folio cotton print. I'll send an email to the owner.
Looking for the Re-Tie-rement quilt? Scroll down ... you'll find it here below this"Big Sister" and Linus quilt pair, below the "Night and Day" quilt, and again below the Bermuda Dream quilt and Row by Row blocks ... took me a while, but it is here, everywhere! :) Enjoy the tour~
Update: 6/29/2014
A Pair of Happy Brother-Sister Quilts
 |
| Zoe with her "big sister" quilt: no wonder I'm a "Happy Quilter" ~ look at her smile! :) |
 |
| Here is her little brother Xander on his Linus Quilt ~ He, like Linus, appreciates his thumb and blanket. |
Tonight, I finished the "big sister" quilt for the daughter of a friend of mine. She's five years old, and her family has a new baby - a little brother! I planned on bringing a Linus quilt over for the baby, and decided to make one for his big sister, too. I had a lot of fun working with the bright fabrics and pretty prints for her quilt. The two quilts are the same size, 36" x 45", with diagonal rows of quilting 5" apart. Here are a few photos of the two quilts:


Update 6/26/2014
I finished backing, quilting and binding a customer's wall hanging tonight, and will give her a call tomorrow to let her know that it is ready. I like doing things that help others finish projects, and this was a very nice one to work on. I stitched in the ditch for most of it, and then ran a few rows of scallop quilting vertically and horizontally. I ended up taking out some of those rows where they crossed the white fabric, and liked it better without the green thread crossing the white/green marbled fabric. Sometimes, less is more! Here is her work, and my quilting as seen on the back. I added a sleeve as well. Pricing such work is always a puzzle to me. But I found an interesting site for a long arm quilter who uses a quick measurement-based calculation. My quilting is not done on a long arm, but I think the method she uses can work for a domestic-machine quilt job as well. It averages out to about two cents per square inch, plus batting and backing/binding fabric costs.
 |
| She did a great job piecing this log cabin alternative wall hanging. |
 |
| I didn't stitch in every ditch, as I think sometimes quilts have details that can be lost in the quilting. As long as I meet the minimum distance recommended by the batting company (in this case, 5 inches maximum space) I'm happy. |
 |
| I scalloped around the binding and on the white frame, and stitched in the ditch in other places. The sleeve on the back is both machine stitched into the binding, and hand stitched along the bottom. It's a little more clear if you click on the picture to enlarge it. . |
Update 6/22/2014
Tonight, again with Rick's help, I finished the quilt for my sister and her husband. I named the quilt "Night and Day" and Rick ran the label through the embroidery machine and I ironed on the words. It puckered a bit with the heat of the iron on the interfacing, but the puckers will either wash out eventually or blend in with the quilting. I'll send her an email to let her know it is finished, and ask her if she wants it now or on July 4th when we usually get together at her home. She's been very patient as I worked on this with several interruptions for other projects that had deadlines pending. In this half year, I've completed six quilts, and hers is by far the largest. Here are the finished photos:


 |
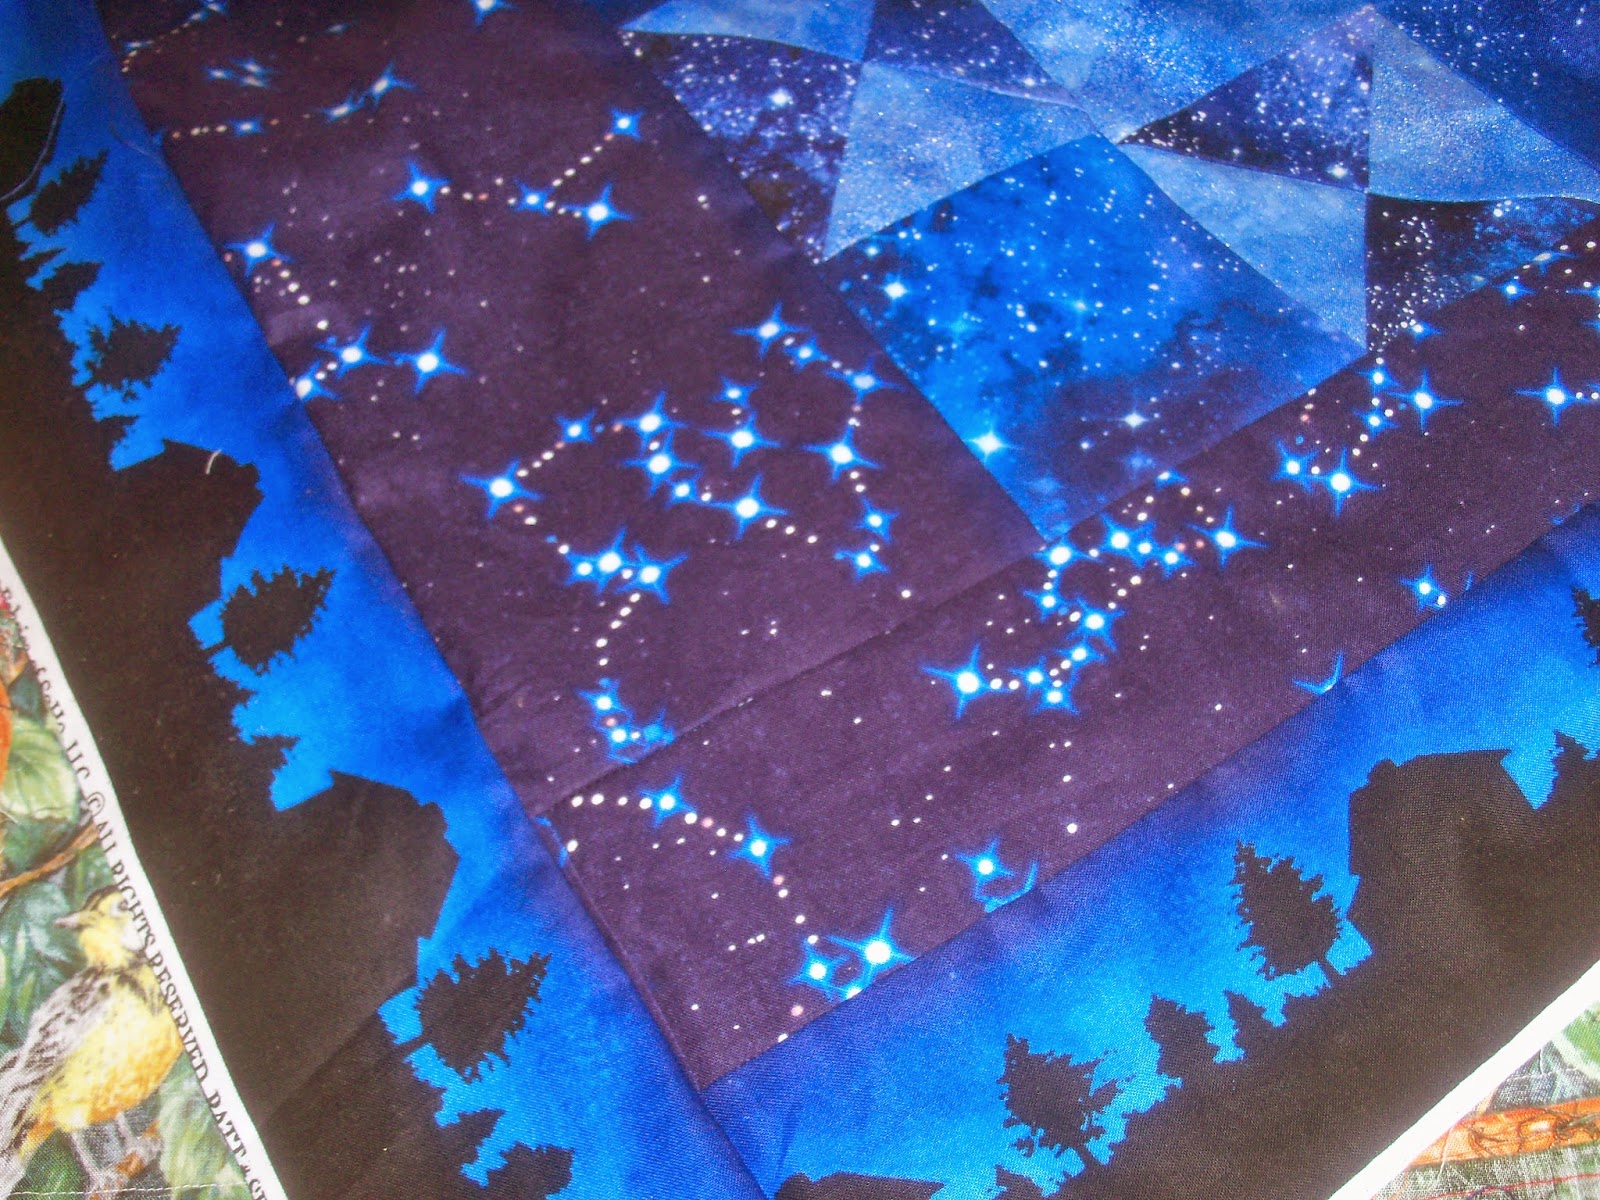
| Night ... stars across a a field of constellations |
 |
| and Day, with birds, blueberries, cranberries, hearts and leaves in lattice frames |
 |
| The label and the binding of blueberries finish the quilt. |
Update 6/19/2014
Today, with Rick's help, I finished quilting the bird/berry/night sky quilt, and trimmed off the excess batting. Tomorrow I will work on binding it, and call this one a success! I made many mistakes along the way (and learned a lot from each one) and we did a lot of frogging through the months (rip it, rip it, rip it.) I brought it for 'show and tell' to the Merrimack Valley Quilt Guild tonight. All I have left to do now is put a binding on it and label it. I'll post a finished picture of front and back once the binding is done. :) And tonight one of the members of the guild asked me about the night sky fabric, and when I told her I had it in the shop, she said she will come by to get some!
I started the machine quilting with a green thread on top and a variegated blue thread in the bobbin, which looked awful as it stood out starkly against the dark sky, showing all of the unsteadiness in my quilt rows. So we frogged that out, and I went with a smoke-tinted nylon thread, very very thin and meant to be invisible on dark fabrics ... I'd never used such a thin thread before, but the machine handled it beautifully with a little tightening of the bobbin to accommodate the smaller diameter thread. I'm now a strong advocate of the 'invisible' thread!
Of course, one of my 'oops' was forgetting to pull a safety pin out of the center of the back, and I hit "one in a million" as Rick said. The needle pierced the closure head of the pin - not through an open space or a hole in the pin, but right through the metal. Rick rescued the jammed quilt by cutting the safety pin in half and carefully removing the needle and pin, still firmly wedged together. I am so blessed to have him with me on this journey through life ... time and time again he has come to my aid, willingly, graciously, patiently and competently. Blessed, I am. Here's a photo of my 'direct hit.'
 |
| The needle did not bend! |
I finished piecing the back of my sister's quilt, and am ready to "make the sandwich" by fitting the batting, front and back together. Then I'll pin and quilt it, and then bind it, and optimistically finish it by the end of this month.
But first, I had to trim all the loose threads from the front. The birds in our yard will appreciate all of these colors.. It took me about two hours to snip them all, dropping them to the floor and then scooping them onto a plate to put outside for new bird nests.
 |
| Food for the birds? No, threads for their nests. This fabric is beautiful -- this is the wrong side of the fabric, and the colors are still vibrant and bold, which is what my sister asked for. But I never expected this much thread to have unraveled after a gentle machine wash .... live and learn! |
It took more than thirteen feet of border to go around the perimeter of the back of the quilt, but I like the way it came out. The binding and background of the back were all of one bolt of fabric; I cut the border off the bolt before beginning to piece the background and the stars together. I only had to piece one strip, and managed to do it along the center of one of the skinny trunks of the pine trees. Together, it reminds me of the planetarium light shows at the Boston Museum of Science.
 |
| This is the back, complete with border |
 |
| And the front, trimmed to match the narrower back |
 |
Update 6/13/2014
Friday the 13th and a Full Moon tonight.
I've begun again on the bird/berry/night sky quilt, and am happy with the way the back is going. (Scroll down past the tie quilt the Bermuda Dream quilt, the Row by Row kits and Linus to see the earlier posts on this bird/berry quilt.) It will be finished in another day or so, and then squared up to fit the front. How to quilt it is still undecided ... leaning toward a diagonal grid pattern to accommodate the different-sized blocks on the front and back.
 |
| Six inch blocks of birds, with three inch sashing of berries and bold blenders, and leaf and heart appliques on the corner stones. |
 |
| Twelve inch blocks of Aunt Eliza's stars done in lights and darks against the dark space fabric. The border of the back will be a skyline of houses. More pics will follow. |
 |
| Shimmery blue adds a twinkle to the stars, whether used in the fore- or back-ground. |
Yes! I finished it a day early! I'm very happy with the outcome, and think the recipient will be pleased with it. Here's the back nearly finished, and then the front and back with the binding in place. Hooray!


Now scroll down to mid-May and beyond, to see each calendar block of the front in detail, including the set of ties used to make each one.
**************
Update 5/25/2014

Before returning to finish the tie quilt, I took a few more days to make a quilt for my sister Marilyn's birthday. She and her husband Chuck enjoy visiting the Bahama's, and so a nautical-themed quilt was just right for her.
I had gone online to eBay looking for summer themes about a month ago, and found a panel that was perfect. It was small, measuring only 15 x 23", but I had fabric in the shop that matched the colors well.

I added sashes of differing widths and chose a back and binding of an ocean print. Using one of the variegated spools of thread, one with blues and greens and sand tones in it, I machine quilted it with 3 ounce poly fiber, using the scallop stitch that went well with the rippling wave pattern of the back. I debated whether to call it Ocean Dream or Bermuda Dream, but when Marilyn saw the quilt, she said it looks just like Bermuda! Success :)

**************
I've taken a break from the tie quilt, as I'm sure it is only a matter of a few more days to finish it, and I still have a week and more before the presentation. So I've spent the last week working on things for the Quilters' Quarters Row by Row blocks. The first thing I did was make the display license plate quilted wall hanging:
 |
| This is our banner, using our slogan and some of the Row by Row Sew a Season fabric. |
And then I worked with Rick on designing the block that would represent our chosen season: Winter. Here's what we came up with, after much trial and error with colors and fabrics.
 |
| The single block measures 9.5" square |
Next, I had to be sure that the row of blocks wouldn't exceed 36.5 inches. Four blocks would be just right. I liked a quilt that used the Attic Window Block, so I adapted the size to fit the fabric I wanted to use.
 |
| Four blocks connected measures 9.5" x 36.5" |
The final step was to add sashing to my row of winter blocks. That will be sufficient to hang as a model for customers who come in to pick up their free pattern for the row, which we will call Beyond the Winter Window.
 |
| This row of Beyond the Winter Window will blend very nicely with similar rows I'll add for spring, summer and fall fabrics. Two rows of each season will make a nice, rectangular block. A few extra rows of sashings on the side will balance the dimensions to a comfortable size. |
I have to adjust the figures to be sure the measurements don't exceed the block contest dimensions. Then, anyone who comes in to Quilters' Quarters will see the model, receive a free pattern of our design, and have an opportunity to buy a kit containing enough material for one block, or buy enough material to make the full row.
And now, back to the tie quilt. The back is almost ready to join the front, and some additional stitching will secure the 'sandwich' of front, batting and back.
**************
Update 5/16/2014
The back is begun:
Random Remnants will cover the back. About 20% of the back is fused and waiting for top-stitching.


Update 5/7/13
Block 12 and 13
The Front is Finished!
 |
| January Block: all creatures great and small |
 |
| The finished quilt front, with special center block that holds a special tie of honor |
Update 4/29/2014
Block 11: May
May is always a month of memories; some are recent, some distant, some clear and some vague. An educator has so many things to keep track of in the present; remembering things of the past is not always conducive to forward motion though learning from the past is. These ties are a mix of science and art, history here and abroad, decades,centuries... perhaps a millennium ago... you'll find the Book of Kells; ancient Greek or Roman coins; the tools of art past and present; Canadian postage honoring their best; recent scientific discovery in this century, and arrivals in New York Harbor
 |
| May ties, though I didn't use the calendar tie yet... I have a different purpose in mind. |
 |
| May block, a mixture of memories academic and other |
Update 4/27-28/2014
Block 9 and 10: August and June
Starting to pick up speed now, finishing at least a block a day. The twelve calendar blocks will be finished by Wednesday of this week, leaving the large center block before the back is created.
 |
| August ties that speak of world travel and vacation |
 |
| The August block, with air travel then and now. |
 |
| June ties speak of FUN |
 |
| June Block: School's out and Cartoons are in! |
Update 4/25/2014
Block 8: July
 |
| July ties ,,.. patriotism in the summertime |
 | |
|
Update 4/23/2014
Block 7: September
World Peace Day
Both of the ties I found for September were designed by children as part of an initiative
Save the Children: Let the children lead us to peace.
 |
| We found we had two of the same tie: one with a Save the Children label and one without. I used the one with the label and the child-artist's name. |
 |
| I saved the track team tie for another month. And I've decided that, since his school was a magnet school for music, music will appear in each block, somewhere... |
Update 4/20/2014
Block 6: March
The Irish do love their music, and I had some ties left to use with musical notes and piano keys, so here is what I came up with: *they also like their jelly beans, in anticipation ...


Update 4/17/14
Block 5: April?
This one might be April ... I wanted to keep the calendar in mind for all of these blocks, but he's the principal of a magnet school that features music as its strength. Poetry month is April, and music is songs, and songs are usually poems ... so this is what I have:
 |
| Had already opened their seams and begun pressing them before remembering to take a picture of the ties intact. |
 |
| The tie placed diagonally across the block is the handwritten score by Jerry Garcia for one of the songs he and the Grateful Dead played. |
Block 4: February
Yes, I know I skipped January ... but as I started with October, I make no pretense of doing these blocks in order. I do them as I think of a pattern for each set of ties. This one has a valentine theme, with penguins, hearts and musical instruments (though I'm afraid the horns are hard to find in the mix of colors and strips.)
 |
| Five February Ties |
 |
| This block uses the same red metallic thread as the December block, but in a scallop stitch instead of a tight zig-zag. |
Update 4/13/2014
Block 3: December
I finished this one last night and was very happy to do so. The silk on these blocks is so very soft that it had a mind of its own, and continued to sway to the side despite the interfacing I had applied to the back of it. I think for the next block, I will attach the interfacing to the muslin foundation square, and then iron the silks directly to that. Time will tell. But here is December:
 |
| Six ties for the December block. Penguins have a striped-candy back. |
 |
| Snoopy's packages and the candy were easy borders for this one. |
Update 4/10/14
Block 2: November
Again: five ties to build a block for the month of November. The different size images on each tie is sometimes challenging, but this one seemed to design itself. It's almost done ~ just a pile of leaves needed in the lower right corner to hide the pieced background seam. I'm having fun with these!
 |
| November ties |
 |
| November block |
Update: 4/5/14
Some say that teachers must have ADD (Attention Deficit Disorder) to be able to pay attention to a classroom of students, which is like listening to 25 radio stations at the same time, and continually switching their activities to keep each one engaged. True enough. But sometimes as a quilter I feel equally distracted and looking for the next challenge, and so often I find myself juggling two or three projects simultaneously. That only works when deadlines are far away, or flexible.
I have a friend whose husband is retiring from a forty year stint as an elementary educator. Needless to say, he has acquired a significant number of neckties through the years, and her wish is to give him a wall hanging made of them. So I've begun that project (between the night stars of my sister's quilt in progress) and have completed one month's block of a 12 block wall hanging.
If things go as planned, the blocks will be done by the beginning of May, and I'll then think about quilting it. Its deadline is the last week of May. Here's the beginning ... No doubt about which month this one is! A five-tie Halloween collection.
 |
| Wish I had thought to snap a photo of the ties when they were intact. |
**************
I've been working on my sister and her husband's quilt for a few months now, in between other projects that have more pressing timelines. But I'm making progress ... this week I'm working on the 'other front' which is a sky-scape of dark sky, large stars and smaller distant constellations. Stay tuned for more photographs to follow soon!


 |
| June ties just say FUN! |
**************

Of course, when he arrived, I had to make a quilt (or 'blankie') for him to show in the shop. I'll attached a sign that reads: Every time a Linus panel is sold, money is donated to the Linus Project by the Quilting Treasures company. I was happy to buy a bolt of ten panels, and already have a new baby in mind for one of them. And this first one will stay with us in the shop as a sample quilt until I run out of panels, and then it, too, will join someone's little baby. It took only 16" of gingham to border the panel (I cut four inch strips across the width,) one yard of muslin to back it, and a little more than a yard of batting. I used one of my new disappearing markers to draw diagonal lines for the quilting, and then used a scallop decorative stitch with white thread.
But after I finished it and hung it on the shop wall, I thought: next time, maybe I'll applique a yellow circle at the top corner, and quilt it with a shimmering, variegated Sulky yellow for sunbeams!

In case you can't read the words on the quilt, here's what they say: "Happiness is a thumb and a blanket."
I am still working on the bird quilt, but now I'm planning and beginning on the back. I'll post some pictures of the night sky fabric and the first star blocks that I've begun sewing for that quilt. Stay tuned!
**************
Update 2/27/2014: Berry Hearts and Green Leaves
I have added various appliques and then removed them. The heat'n bond iron on sealant removed easily, which confirmed my thought that it would need to be top-stitched or it would fall off in the laundering. So I removed all of them (well, I'd only applied them to 44 of the 88 corner blocks) and chose to replace only the berries, now cut as hearts, and the individual green leaves, eliminating the brown diamonds and the orange/green, blue/yellow half-squares. Less busy, less distracting, and maybe the final design of this quilt front. We'll see~
 |
| machine-appliqued with green leaves and hearts of berries |
Update 2/22/2014: Back to the Birds
I finished the 70 blocks, and completed them with a right side and bottom sashing (each block was made with a top and left side sash.) The quilt top now measures 66" x 93" inches. I haven't decided whether, with the triple sashing, it needs any additional borders.
Next, I'll add small appliques to the yellow corner blocks of the quilt top. I have four choices: a green leaf, some brown leaves, or blueberries or cranberries ... and may ultimately use some of each. Then, I'll be ready to start the backing, which is a totally different look.
Here's a sneak peek of the queen size top and the sample appliques:


Update 2/18/2014: Took a little break
The quilt with the bird blocks and triple sashings is coming along; I've pieced all seventy blocks and am now joining the blocks row by row. With six of the ten rows joined, I decided to take a small break and work on a challenge block for the Merrimack Valley Quilt Guild.
I've never done a star block before, and managed to sew and rip out and re-sew each portion of this block one by one. I could say I was tired and that's why I kept repeating mistakes; in truth, I was tired and kept repeating mistakes!
But it worked out eventually. Here's my first star ~ a block called "Aunt Eliza's Star" from the Delaware Quilt website. http://www.delawarequilts.com/BOMs/index.html

Update 2/1/2014: My second quilt of the new year:
"It's like writing a recipe ... a quarter yard of this, a three and a half inch square of that, an arm's-length of inch and a half strips of every color and ...
Now who could all those bold colors be for?"
 |
| I sort of have a plan ... |
Some of these fabrics are from the four story warehouse that we shop in Pembroke, MA. Some are from the visiting salesman who visited us last month. And all of them are of good quality, from reputable fabric companies like Blank Quilting, and Henry Glass. I was awake for a while last night, wondering how best to use these beauties together. I thought about the Irish Chain pattern that I just used for the Valentine Quilt. I thought about a log cabin design, and then I thought about simple framed blocks. I'll use the brown for the corner blocks, to pick up the branches' color.
 |
| Okay, these colors are good together, for a start. |
Update 2/5/2014: change in plans...
 |
My quilting group helped me realize that the brown
corner block was too quiet for the bold colors in the quilt.
So yellow it is ... not a bad evening's work: sixteen squares, and only 47 more to go. Then come the borders, and then a spectacular masculine backing before the actual quilting begins. These blocks aren't sewn together, and the yellow blocks will fit the corners more accurately when they are. I'm going to put something in the center of some of the yellow blocks ... a bee, perhaps, or butterflies ... something subtle.
|
Update 2/8/2014: how to fix what seems wrong ...
The more I looked at it, the more the size of the yellow blocks troubled me. I liked the color; I knew they measured the correct size as corner blocks for the triple border, but they looked out of proportion. And then I realized why. the cranberry and blueberry strips blend into the bird block so well that the border appears to be only two strips wide, causing the corner blocks to look larger. For a few morose moments I wondered if I would start all over with larger bird blocks and smaller borders. I knew that I wanted to do something with the yellow corner blocks ... add an appliqued something to each one. And then I knew what to do. I've always liked squares within squares, and so I went back to my brown corner blocks, trimmed an inch off each, and centered them on the yellows. Presto - I'll have to trim them a bit more, but already they are identifying the triple border for what it is! This may be the design I've been searching for. Now to make the rest of the blocks. To fit a queen size bed, I'll need at least seven rows of ten blocks. I'll need 42 more. But they will go quickly. Now thinking I ought to make a larger quilt design wall :)


**************
The first quilt of the new year, January 2014
I thought as I'd just finished my first quilt of the new year I would begin a quilt journal page here at the Quilters' Quarters new blog. I'll update it now and then as more quilts pass through my fingers and machine.
On a recent trip to the fabric wholesaler I was looking for fabric to celebrate Valentine's Day. In a section of seconds, I found a bolt of red cotton with white hearts. It was relegated to seconds because the bottom of the bolt had a three inch strip that had missed the coloring vat somehow, thus shortening the overall 'usable' width. So I bought it knowing it would be wide enough for a lap quilt. And it is!
 |
| Nine patch block, quilted |
 I love the Single Irish Chain pattern of alternating solid blocks with nine-patch blocks. In the past when I've made these, I've ordinarily 'tied' rather than quilted the body of the quilt. I wanted to try my hand at free motion quilting, but learned quickly that, with a tremor that is increasing year by year, that may not be the best approach for me. Instead, with my machine's "walking foot," I decided to use what I call the "S" stich on my machine and quilt in straight lines, diagonally, following the points in the pattern. I used white thread to quilt across the white nine-block squares, with red in the bobbin for the solid red/heart back, and red for the solid red/heart squares.
Once I finished piecing the top (by machine) I measured the quilt and added a few inches to the measurement on all four sides for the back. I then opened a pre-cut package of polyester batting that was larger than the size of the quilt by a few more inches and put the sandwich together with quilt spray. After putting pins carefully in areas that wouldn't interfere with the diagonal quilt lines, I began the quilting.

Beginning in one corner, I worked diagonally across the solid red/heart squares row by row. Each row was a little shorter as it approached the edge of the quilt. I then turned the quilt around to start at the other corner with a red square and finished that half of the quilt. Next, I changed to white thread (leaving red in the bobbin) and did the same thing for the white diagonal rows, beginning at a corner and continuing row by row, then turning it around and beginning the other half of the quilt. By starting in the center of the quilt and working out to one side, then returning to the center and working toward the other side, I avoided "bunching" the batting and was able to smooth it out as I went along. I was amazed that it worked so well. And as you can see, by following the straight, diagonal lines of the pattern, my tremor wasn't a factor. And the quilt rows are just four inches apart, making a secure but still fluffy anchor for the batting.
The quilt has a three-inch white border for the top, and I did a simple row of S-stitch quilting along the inner edge of that before adding the red/heart binding. I'm very happy with the results. The material cost me about $30.00 in all, including fabric, batting and thread. If I am to sell it in the shop, I will ask $50.00.
 |
| Single Irish Chain lap quilt, 40"x 50" |
This comment has been removed by the author.
ReplyDeleteI hope you will provide some more info for the betterment of our knowledge. Your blog article is well described.
ReplyDeleteBallot Box Suppliers | Voting Booths
Visit more pages at our blog; see the table of contents in the right hand margin of any page, click a page and see what we've shared~
ReplyDelete